
Page 47 - Circular Connector Backshells and Accessories
P. 47
Banding System Shield Termination Tools How to Order
Tools provide the user with consistent, repeatable back- 3. Mount holder on square drive of torque wrench.
shell installations. Designed primarily for production Carefully mate with connector, and hand-tighten
assembly use, the tools can also be used equally well Glenair backshell coupling. To assure proper mat-
for successful field maintenance operations. ing, anti-rotation teeth must be fully engaged.
Glenair Backshell Assembly Tools may also be uti- 4. Tighten rotatable coupler with assembly tool.
lized effectively with backshell rotatable couplers pro- Do not use excessive grip on handles. When cou-
duced by other manufacturers, providing the "B" refer- pler begins to tighten, relax grip and rotate assem-
ence diameters are consistent with Glenair values. bly tool back 90°, then resume grip and continue
Recommended Tightening Procedures to tighten; repeating this sequence until desired
Recommended tightening procedures, tools and torque level is reached.
torque values offered by Glenair are intended as an aid
CAUTION: Do not apply torque in excess of
to properly fasten the backshell to the connector inter- signal setting. Excess torque will cause signal
face threads. Glenair offers a variety of tools to accom- pointer to reset and give erroneous readings.
plish proper tightening; our 600 Series pliers with re-
placeable pads are configured to make maximum cir-
cumferential support to each specific size backshell to Setting Torque Levels
be tightened, our TG70 strap wrench (page 6) is intended To verify proper backshell installation values, electri-
for general use on any diameter between .50 to 3.00 cal signals are built into bench-mounted (audio) and
inches. Hand-held and bench-mount torque wrenches hand-held (light) torque wrenches. The procedure for
accomodate our 600-005 plug or receptacle connector setting torque levels is the same for both units.
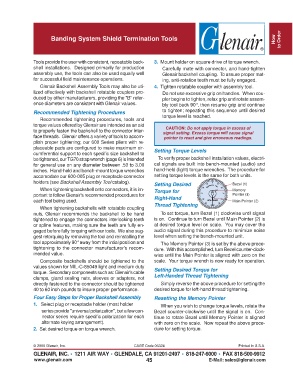
holders (see Backshell Assembly Tool catalog). Setting Desired Bezel (1)
When tightening backshell onto connectors, it is im- Torque for Memory
portant to follow Glenair's recommended procedures for Pointer (3)
each tool being used. Right-Hand Main Pointer (2)
When tightening backshells with rotatable coupling Thread Tightening
nuts, Glenair recommends the backshell to be hand To set torque, turn Bezel (1) clockwise until signal
tightened to engage the connectors interlocking teeth is on. Continue to turn Bezel until Main Pointer (2) is
or spline features, making sure the teeth are fully en- at desired torque level on scale. You may cover the
gaged before fully torquing with our tools. We also sug- audio signal during this procedure to minimize noise
gest retorquing by removing the tool and reinstalling the level when setting the bench-mounted unit.
tool approximately 90° away from the intial position and The Memory Pointer (3) is set by the above proce-
tightening to the connector manufacturer's recom- dure. With this accomplished, turn Bezel counter-clock-
mended value. wise until the Main Pointer is aligned with zero on the
Composite backshells should be tightened to the scale. Your torque wrench is now ready for operation.
values shown for MIL-C-85049 light and medium duty
torque. Secondary components such as: Glenair's cable Setting Desired Torque for
clamps, gland sealing nuts, sleeves or adapters, not Left-Handed Thread Tightening
directly fastened to the connector should be tightened Simply reverse the above procedure for setting the
40 to 60 inch pounds to insure proper performance. desired torque for left-hand thread tightening.
Four Easy Steps for Proper Backshell Assembly Resetting the Memory Pointer
1. Select plug or receptacle holder (most holder When you wish to change torque levels, rotate the
series provide "universal polarization", but a few con- Bezel counter-clockwise until the signal is on. Con-
nector series require specific polarization for each tinue to rotate Bezel until Memory Pointer is aligned
alternate keying arrangement). with zero on the scale. Now repeat the above proce-
2. Set desired torque on torque wrench. dure for setting torque.
© 2005 Glenair, Inc. CAGE Code 06324 Printed in U.S.A.
GLENAIR, INC. • 1211 AIR WAY • GLENDALE, CA 91201-2497 • 818-247-6000 • FAX 818-500-9912
www.glenair.com 45 E-Mail: sales@glenair.com